Showing posts with label before and after. Show all posts

5.15.2015

RUSTIC INDUSTRIAL KITCHEN


There's something about this kitchen. For a long time, I wasn't sure it was going to work out. Early on we discovered half the room had no foundation, and then there was the fireplace fiasco, and we seemed to hit a dozen other speed bumps along the way. And now somehow, in the blur of the past 6 years, we're done and everything is legit! 

We still need to install the pulls on the cabinet doors under and flanking the range top, but for now I'm just thrilled that all the tools and dust are finally gone. (The kitchen has been our makeshift workshop--again--for about 6 months now.) 

In addition to having floor drains, which allow for easy cleanup, we also have a ceiling outlet hanging over the island. It's not the prettiest thing, but so very useful!

I made the little sink skirt out of a canvas drop cloth last week. I'm still undecided about whether I like it or not, but I thought some prospective buyers might not like seeing exposed plumbing. It does add some softness to the room, which is kind of nice in relation to all the concrete and stainless steel. 


I didn't do the stained stair runner as planned, because I didn't know if that would be universally liked, but I still love how this staircase and pantry corner turned out.


I know it's not everyone's style by any means, but I'm really happy with how it turned out overall! What do you think?

5.14.2015

THE BIG REVEAL: MASTER BATHROOM

Ez has decided his favorite room in our house is the master bathroom. It's a tough space for me to photograph with my limited skills and the lack of natural light (this room's biggest drawback), but I think you can get the idea...


 Some fun facts:

  • The bathtub was a craigslist score for $125. (Thanks for picking it up for us, dad!) It was originally painted bright yellow. 
  • The swing arm light above the tub is from Restoration Hardware.
  • The mirror was a free hand-me-down from Ez's aunt. I had looked high and low for a mirror for that oddly shaped space, and nothing seemed to fit right. Then I yanked this one out of the guest room a whim. Perfect! 
  • The marble countertop is a remnant from the bar at the new Petit Louis restaurant in Columbia, Maryland. Ez's dad did the plumbing for the restaurant and bought the leftover piece from the tile guys. 
  • All the rustic wood trim was salvaged from various parts of our house.


If we were staying in this house, I'd hang a pretty piece of art in an antique frame above the tub and get an interesting rug for the floor, because I recognize that it's seriously lacking in color and personality at the moment. And I'd continue asking for the skylight I had really wanted in here. (We couldn't add any new windows because our log guy said it would compromise the house's structural integrity.)


I really love getting ready in here every morning! Our new home's bathroom is cute and retro with original black and white tile, but it's a tiny space. This is one room I'll definitely miss when we move, and one we're really proud of. It's been a very long time coming, and I'm thrilled to share it with you!

And, as a reminder of how far we've come, here are the few pictures I have from "before":

There used to be a staircase going from what is currently the dining room up to this room. We took out the stairs and closed up the hole, and that area is now the bathroom sink and shelving. 

This is my mother-in-law, and the wall behind her is where the bathtub is now. The 6' ceilings had to go. 


Not the best angles for comparison, but then again there's no comparison! 

1.02.2015

AT LONG LAST: A PORCH RAILING


First of all, let me wish you a very Happy New Year from our little corner of the world. I hope you've all had a fantastic set of holidays! Ours had some highs and lows--one of the lows being a late-night trip to the ER and a diagnosis of croup for Johnnie (who is thankfully feeling 100% better now), and one of the highs being the long-awaited completion of our front porch railing.

This railing was such a challenge. (Ez requested that if anyone asks how long this project took us, I should tell them anything but the embarrassing truth.) The brick, selected to match the house's original chimneys, is quite soft, and finding a way to firmly anchor the newel posts without cracking the brick proved difficult. Our first attempt, using the standard black metal newel posts (shown here) that matched the railings, failed because it required sinking four screws for each post, and a few of the bricks cracked during the drilling. As a result, we had to have the brick man come and replace six bricks--this time with one big hole pre-cut into each one. This new method necessitated a different type of post that could be anchored with one long threaded rod sunk a couple bricks deep. Our only option was a chunky pressure treated newel, which we happen to like exponentially more than the metal newels.


Hooray for Plan B being better than Plan A in every way! Once the wood newels are stained to match the logs, I think it will look just right. In addition to being the far sturdier solution, the wood newels make a more substantial statement visually than the dinkier metal ones. I'm so glad Plan A didn't pan out. Plus, the house looks almost done now, right? So much improvement with one project! (Also, SAFETY! WOOHOO!)

FYI, all the railing parts were off-the-shelf from Lowe's. Note #1: because this seems to matter more and more to blog readers nowadays, this post was not sponsored and we purchased everything ourselves. Note #2, and a tip: for a project like this one, you really need two people. One person can do it, but two people can do it three times faster.

Finally, for those interested, my Christmas/winter decorating took about 15 minutes (including screwing in the hooks for the door garland). Since our only evergreen tree (i.e. my source of free holiday decor) fell in a tornado last year, these decorations cost me between $25 and $30 in pine from the local market--$18 of which was just for the pre-made wreath. It's definitely not the fanciest house on the lane, but I think it works and looks like we at least made an effort this year. :)


Pardon the in-progress mess and oversized light bulb (it's dark way out here in the sticks)... 

I especially love the window boxes. I was going to just take them down until spring, but instead I chopped up two $4 pine swags and jammed the branches into the soil. Boom. Done. This is not the best photo, but it's my favorite thing. 


So that's the railing. Can you believe we finished something? It's been awhile since we've gotten to cross a project off the list. Let me tell you, it feels WAY better than falling down the steps.

4.21.2014

BEFORE AND AFTER: DINING ROOM


I'm home sick from work today thanks to a sore throat, headache and complete lack of voice. While letting my Lemon Echinachea tea steep for the recommended 10-15 minutes, I took the opportunity to snap a few photos of the finished dining room as it looked for our very first "dinner party" -- Easter lunch with my brother's family over the weekend.


I still need to paint the baseboards, hang some art and futz with details, but for now I'm calling it done. We all deserve that, I think.


And because you've all been waiting patiently for so many years, here are the "before" pictures so you can compare a real before with a real after and in real time: five and a half real years later. This is the stuff blogs are made of!


The logs were hidden behind those built-in shelves. There was also an addition built on the side of the house that we had to rip off because its floor joists were made from parts of metal shelving (which is, ah, not compliant with our local building code).

Here it was during the demo phase, during which we exposed the logs, rerouted the floor plan and removed not one but two unnecessary staircases to the right of the chimney (one was creepily hidden behind a wall):


And this is how it looked just four months ago, back in December.

And again, here we are today.

Much better!

And once again, I just want to thank everyone who has been reading for a long time. You have truly kept us going throughout this long process and enduring mess.

For those who are interested in sources:


3.03.2014

NEW VIEWS


This is what we're looking at lately... Even with all the baseboards still to paint, shoe molding to install, and details to attend to, I have to admit the mood around here is considerably lifted. We're walking around barefoot, picking out furniture and enjoying our newfound spaces. Since these rooms are still in blank-slate territory, I wanted to post a few photos to show you where we're starting from. In a way, these are kind of our new "before" pictures. That cozy little corner above is where our desk will go -- and hopefully soon, too. Setting that up is one of our next priorities so we can have a designated spot for bills and paperwork, which have a way of getting out of hand quickly.

I love this ceiling.


Here's the straight-on angle of the office corner. (As you can see, we also still need balusters for the handrail... In due time.)

And here's a closer view of the headboard Ez made. I'm not going to post a full shot of the master bedroom quite yet, because it needs some work. I haven't found a new coverlet yet, so we're temporarily using the one from our old bed. Not only is it too small, but it also has these thick gray and white stripes that clash terribly with the similarly stripey exposed log wall... Not a good look. I don't want to scare you. Nonetheless, our new bed remains the most comfortable surface on this planet, so no complaints here.

And here's a little peek into my closet. I've been researching tons of closet organization systems, and I've pretty much decided on the PAX from IKEA. (Does anyone have one? Thoughts?) It's really the only thing I can find that seems sturdy enough and will fit the incredibly restrictive space I have to work with. Also I'm not looking to spend thousands of dollars, so...

The photo below will give you a better idea of the steep pitch of the ceiling, which is a real challenge in this design-your-own-closet adventure. I really wanted a Stolmen system, but unfortunately there are about a dozen reasons why it won't work. However, it seems I can fit one of the shorter, standard-width PAX units in the taller corner without bumping into the ceiling at all. I'd pack it with drawers and shelves and then run a clothing bar from the outer left side of the unit to the short back wall for my hangup clothes. We went to IKEA on Saturday and had a thoroughly dissatisfying experience (sold out of everything we wanted), so hopefully they'll pull through for me on this one. Please, IKEA. I'm counting on you.


And finally, just for good measure, here's what things look like when you first walk in the front door. It's a little sparse, I realize, but we're working on it. The dining chairs I ordered are on their way, and we're spending our evenings comparing thoughts about dining room rug options. (Meanwhile, I keep expecting those baseboards to paint themselves.)


It's a teensy bit stressful for me to make so many decisions at once, but it's really fun too. Especially when Ez and I manage to agree on something once in awhile! Anyway, that's our blank slate for you. Looking forward to cozy-ing it up a bit over the next few weeks and months.


1.07.2014

MASTER BEDROOM PROGRESS

Confession: we hired painters. I feel a teensy bit guilty admitting that, considering this is basically a DIY blog and painting is DIY 101... But, since it took me weeks to prime all 8+ remaining rooms by myself (using thick, uncooperative oil-based Kilz primer and applying 3 coats on the wood planks to prevent the knots from bleeding through), there was no way I was going to be able to go back and paint everything in a reasonable amount of time. I am spent, you guys. SPENT! 

New Year's Resolution: Stop being so spent all the time.

So now the master bedroom, bathroom and closet are painted, along with the laundry room, office, dining room, entry, powder room and coat closet. (Whew!) That's a lot of rooms, but the painting crew got it done in a single weekend. I am so, so thrilled that job is no longer on my plate -- I'd have been painting until next Christmas, no joke. We had every room painted the same color. I know it's not very exciting, but eventually I will probably choose to repaint a few areas after we have some time to get acquainted with the spaces. In the meantime, this "shades of white" vibe feels clean, calm and innocuous, and those are words that sound very appealing to me these days. 


Anyway, what you're looking at here are the various angles of a cluttered but almost finished master bedroom, complete with freshly painted walls and ceilings. Literally, all that's left to do in here from a "construction" standpoint is: 
  • Install a vent cover, can light covers and one pendant light (currently back-ordered)
  • Window and accent trim
  • Baseboard
  • Stain and poly the floors
  • Stain the logs (that was never done in here for some reason)
That's it. Then we can move in! And here's the opposite wall...  


Apologies that I didn't kick some of that junk out of the frame, or take the plastic wrap off the smoke detector... 


There is just enough room for a king-sized bed (if we even go that route) between those two adjustable reading lights, which I got on sale at HomeDecorators.com. I wanted hardwired lights so we could have more room on our bedside tables (which will have to be pretty small) as well as avoid the visual clutter of electrical cords. I knock over my bedside lamp on a regular basis while reaching for my glasses, so this is exciting in my world. Since this is the only wall where you can easily fit a bed in here, I figured hardwiring was a fairly safe bet.


This is the same angle, five years ago...


Hard to believe it's the same room... Or the same lifetime!


12.31.2013

MY FAVORITE CORNER


Though it isn't completely done yet, this is quickly becoming my favorite little corner of the house. I've mentioned before how tricky it was to configure the stairwell, the railings and all the carpentry involved. (That's why we saved it for one of the last big projects.) I can honestly say it was worth all the headaches and all the time spent staring at a whole bunch of ugliness.

Let's take a little journey, shall we? Here it was before, during the demo phase, five years ago: 

And a little more exposed... This was just before we poured the first of two batches of concrete for the kitchen foundation (previously nonexistent) and finally the floor. Hence all the wire mesh on the ground. 

And more demo... (Wasn't the fireplace adorable before? I still wish it could've stayed that way, but alas, it wasn't structurally sound and had to be rebuilt.)

A jumble of wires and some new stairs at the bottom... We had to add more stairs because we raised the very low ceiling. 

And here it is today. It looks like it was a pretty simple project, perhaps like it's always been this way, and that's a very good thing. It was almost a major disaster and another series of compromises. The permit inspector originally said the pantry wall would have to jut out at least another foot because the electrical box needed more clearance from the front. I was not thrilled. But because of the placement of the pantry door (directly in front of the electrical box) he said that could count as the clearance and we could put the wall where we wanted it -- directly in line with the fireplace. Phew. 


We'll be ringing in the New Year with more house projects, stopping to watch the ball drop tonight and then resuming tomorrow. Not that I mind. Things are looking so very good, it's been great motivation to keep going and checking things off the list.

My New Year's resolution is pretty simple: to finally settle in and enjoy living here. We're almost to the point where that will be possible!

Happy New Year!

7.12.2013

FLY


I know the Fourth of July was like so last week in the blogosphere, but I couldn't resist posting this photo of our little water baby enjoying some Independence Day pool time. I took about 50 photos of her swimming that day, and she has a huge smile in all of them. Good stuff.

Also on the Fourth, I finally -- two years after purchasing the thing -- installed the handleset on the back door. Why the delay? Well, it required drilling a new hole in the door and I just didn't have the energy. But I'm so glad I gathered my wits and did it. (Remember how in this post I talked about needing to make an effort to cross some little details off the list to make life more comfortable? Well, this was one of those details on the list. Gold star for me!)

Now, instead of a basic doorknob and a hole covered by a bunch of painters' tape on the inside (classy!), we have a fly new Kwikset handle and deadbolt set.

Before:


After:


Now, if it would ever stop raining, I need to paint the outside of the door. The current color is primer. And, come to think of it, the inside of the door needs another coat of paint as well. Add it to my list.

7.10.2013

ADIEU, GARAGE

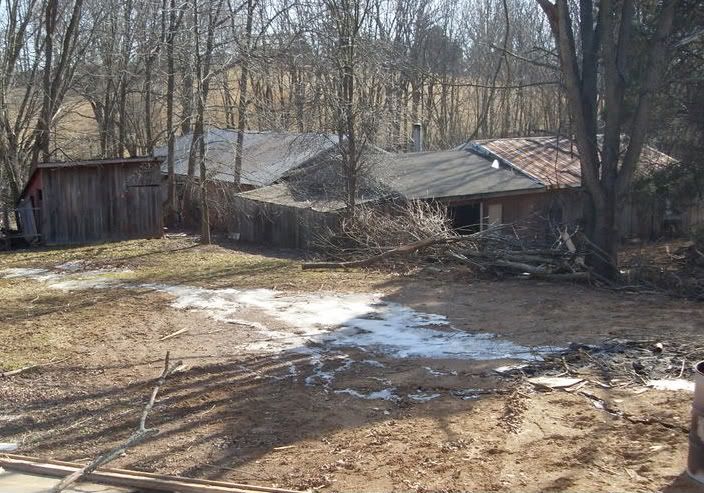
So, here was our overly enormous garage when we first bought the house. The previous owner was a mechanic, so that explains the size. Nothing can really explain the overall falling-down-shanty appearance of the thing. The back part was pretty nice (apparently a tree had fallen on the original part and insurance paid for it to be fixed); the front part was old, falling down and gross. We got rid of the front portion during the initial wave of demolition about four years ago and hoped to salvage the back portion for cars, storage and a home gym.

While this isn't quite as exciting a "before and after" as the house paint, I promised photos and, gosh darn it, I wanted to deliver for a change.

BEFORE


Fun note about the above photo: that giant patch of ice in the yard was from when the pipes burst in the basement and emptied our well into the yard. Thankfully that recurring nightmare of frozen pipes is apparently behind us.

As I described in my sad post about the trees, root balls and the previous owner's lack of foresight, the back portion was not worth saving after all due to drainage problems. Down it came and away it went, the roof and trusses to be used for someone else's building project.

Here's the yard from the same angle now.


I guess it's not that much of an improvement in a photo, but in person it does make a difference to be rid of that ugly old garage (which I promise would've actually been quite nice with new siding). A couple of those scrubby trees still need to go so the garden will get better sunlight, and hopefully by September we'll be able to bulldoze all those weeds and plant some grass in their place.

The patch of ice has been replaced by my garden, but that is another sad story. A few weeks ago, a major storm passed through our little suburb, bringing small tornadoes and golf ball-sized hail. Most of my plants were either snapped off at the stem or had all their leaves shredded to bits. And, as you can see, the pea trellis got knocked sidewise, which was actually not a big deal because every pea plant died in the storm anyway. (We even lost the huge pine tree behind the house when its trunk snapped in half and missed falling on the house by a few yards. This storm was not kidding around.) The kale plants have since regained some of their leaves, I'm still getting lettuce and the carrots are still growing, so it wasn't a total loss. But almost. I guess there's always next year.

Thus ends the garage portion of our programming.


UPDATE as of 09/23/13: I'm closing comments on this post, because for some reason it has become a target for spammers. I'm tired of deleting dozens of spam comments per week on this post alone. Thanks.